
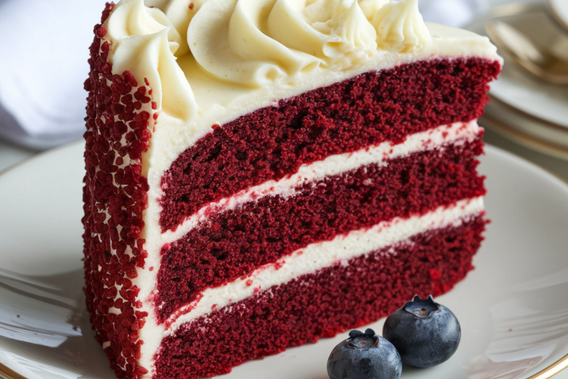
There’s something magical about a red velvet cake. Its deep crimson hue, paired with the velvety texture and the subtle tang of buttermilk, makes it a showstopper at any gathering. I’ve always been drawn to its elegance and the way it balances sweetness with a hint of cocoa. Whether it’s for a birthday, anniversary, or just a weekend treat, this cake never fails to impress.
Over the years, I’ve experimented with countless recipes, tweaking and perfecting until I landed on this version. It’s moist, tender, and topped with a creamy frosting that complements the cake beautifully. If you’ve never tried making a red velvet cake from scratch, you’re in for a treat. Trust me, the effort is worth it, and the result is nothing short of spectacular.
What You Need To Make This Recipe
Cocoa powder: Cocoa powder is the backbone of the red velvet cake’s flavor. It’s not a chocolate cake, but the cocoa adds a subtle depth that pairs perfectly with the tangy buttermilk and the hint of vanilla. Use unsweetened cocoa powder for the best results.
Buttermilk: Buttermilk is the secret to the cake’s tender crumb and slight tang. It also reacts with the baking soda to help the cake rise. If you don’t have buttermilk on hand, you can make a substitute by adding a tablespoon of vinegar or lemon juice to a cup of milk and letting it sit for 5 minutes.
Red food coloring: The vibrant red color is what makes this cake so iconic. Use a high-quality gel food coloring for a rich, bold hue without affecting the texture of the batter. Liquid food coloring can work, but you’ll need more of it to achieve the same effect.
Vinegar: A small amount of white vinegar enhances the cake’s rise and helps balance the sweetness. It’s a subtle ingredient, but it makes a big difference in the final texture.
Cream cheese and butter (for frosting): The classic pairing of cream cheese and butter creates a smooth, tangy frosting that’s the perfect complement to the cake. Make sure both ingredients are at room temperature for easy mixing.
Ingredients List
For the cake:
- 2 ½ cups (315g) all-purpose flour
- 1 ½ cups (300g) granulated sugar
- 1 tsp baking soda
- 1 tsp salt
- 1 tbsp unsweetened cocoa powder
- 1 ½ cups (360ml) vegetable oil
- 1 cup (240ml) buttermilk, room temperature
- 2 large eggs, room temperature
- 2 tbsp red food coloring (gel preferred)
- 1 tsp vanilla extract
- 1 tsp white vinegar
For the cream cheese frosting:
- 8 oz (225g) cream cheese, softened
- ½ cup (115g) unsalted butter, softened
- 4 cups (480g) powdered sugar
- 1 tsp vanilla extract
How to Make Red Velvet Cake
Step 1: Preheat and Prepare
Preheat your oven to 350°F (175°C). Grease and flour two 9-inch round cake pans or line them with parchment paper to ensure the cakes release easily after baking.
Step 2: Mix Dry Ingredients
In a large bowl, whisk together the flour, sugar, baking soda, salt, and cocoa powder. This ensures the dry ingredients are evenly distributed, which is key to a consistent texture.
Step 3: Combine Wet Ingredients
In a separate bowl, whisk together the vegetable oil, buttermilk, eggs, red food coloring, vanilla extract, and vinegar. The vinegar will react with the baking soda, so don’t skip it!
Step 4: Combine Wet and Dry Mixtures
Gradually add the wet ingredients to the dry ingredients, mixing until just combined. Be careful not to overmix, as this can lead to a dense cake.
Step 5: Bake the Cakes
Divide the batter evenly between the prepared pans. Bake for 25-30 minutes, or until a toothpick inserted into the center comes out clean. Let the cakes cool in the pans for 10 minutes before transferring them to a wire rack to cool completely.
Step 6: Make the Frosting
While the cakes cool, beat the cream cheese and butter together until smooth. Gradually add the powdered sugar and vanilla extract, mixing until the frosting is creamy and spreadable.
Step 7: Assemble the Cake
Once the cakes are completely cool, spread a layer of frosting on top of one cake layer. Place the second layer on top and frost the top and sides of the cake. For a professional finish, use an offset spatula to smooth the frosting.
Tips for Making This Recipe
- Use room temperature ingredients: This ensures even mixing and a smoother batter.
- Don’t overmix the batter: Overmixing can lead to a dense cake. Mix until just combined.
- Use gel food coloring: It provides a more vibrant color without altering the batter’s consistency.
- Level the cake layers: If your cakes dome while baking, use a serrated knife to level them before frosting.
- Chill the cake before serving: This makes it easier to slice and enhances the flavors.
FAQs
Can I make this cake ahead of time?
Yes! You can bake the cake layers a day in advance. Wrap them tightly in plastic wrap and store them at room temperature. Frost the cake the day you plan to serve it.
Can I use natural food coloring?
While natural food coloring can work, it may not provide the same vibrant red hue as gel coloring. Beet juice is a popular natural alternative.
Why is my cake dry?
Overbaking is the most common cause of dry cake. Check for doneness a few minutes before the recommended baking time.
Can I freeze red velvet cake?
Absolutely! Wrap the unfrosted cake layers tightly in plastic wrap and freeze for up to 3 months. Thaw at room temperature before frosting.
What if I don’t have buttermilk?
You can make a quick substitute by adding 1 tablespoon of vinegar or lemon juice to 1 cup of milk. Let it sit for 5 minutes before using.
Enjoy baking and savoring this classic red velvet cake! It’s a recipe that’s sure to become a favorite in your kitchen.
Related posts:
 20 Ultimate Chocolate Chip Cookie Recipes You Need to Try Today
  10 At-Home Cookie Recipes for Cozy Baking Days
  20 Blueberry Cookie Recipes Bursting with Flavor
  20 Delicious Banana Cookie Recipes That Will Amaze You
  10 Double Chocolate Cookie Recipes for Chocoholics
  15 Easy Patriotic Desserts for Festive Celebrations
  15 Easy Dessert Cups Recipe Ideas Perfect for Any Occasion
  Texas Trash Pie